
Decked Out Beauty
Luxury Bridal Artistry
On Deck · The Blog Spot
Why Your Foundation Turns Orange by 4 PM
And What Oil Control Actually Has to Do With It
You matched perfectly in the store. You checked it in the mirror before you left the house. And then somewhere between lunch and the drive home, your jawline went orange, your nose went muddy, and your forehead started reading a full shade deeper than your neck.
That’s oxidation. And if you have deep skin, you already know it doesn’t shift subtly — it shifts loudly.
Here’s what’s actually happening on your face, why deeper complexions get hit harder, and why the fix starts long before the foundation ever comes out of the bottle.
What Oxidation Actually Is (And What It Isn’t)
We use the word oxidation as a catch-all, but four different things are usually happening at once. Understanding which one is your problem determines how you fix it.
1. Sebum is wetting your pigment.
This is the big one, and it’s the one almost nobody explains correctly.
Think about dry sand versus wet sand. Same sand — the wet sand looks dramatically darker. Nothing about the sand changed chemically. Water filled the air gaps between the grains and changed how light bounces off them. Less scattering, more absorption, darker appearance.
Your foundation is doing the same thing. As sebum rises through the film across the day, it coats the pigment particles and reduces how much light they scatter back. The result is a base that reads deeper, more saturated, and more chromatic than it did at 8 AM.
2. Your foundation is concentrating.
Most foundations contain volatile carriers — water, isododecane, cyclopentasiloxane — that evaporate within the first 10 to 30 minutes of wear. As they flash off, the pigment that stays behind becomes more concentrated per square inch of skin.
This is why the shade you check at the counter and the shade you wear at hour one are not the same shade. It isn’t a chemical reaction at all. It’s just the base finishing what it started.
3. True pigment interaction.
Foundation color comes from iron oxides — red (CI 77491), yellow (CI 77492), and black (CI 77499) — suspended alongside titanium dioxide (CI 77891), which is the opacifying, light-scattering white. Skin’s natural pH sits around 4.7 to 5.5, and sweat, sunscreen filters, and active skincare can all shift the environment those pigments are dispersed in, destabilizing the emulsion and altering how the colorants read.
4. Your skincare is discoloring your makeup.
Vitamin C is the usual suspect. Ascorbic acid degrades into compounds that carry a yellow-to-brown cast, and if it’s still active on the skin under your base, that cast becomes part of your finish. Certain sunscreen filters and self-tanning residue do their own version of this.
Why Deep Skin Pays a Higher Price
This is where the conversation usually stops short, so let’s actually get into it.
Deep shades carry a heavier pigment load.
To build a deep foundation, formulators dramatically increase red and black iron oxide and dramatically decrease titanium dioxide. That means two things at once: there is more colorant available to shift, and there is less of the white light-scattering agent that would otherwise buffer and mask that shift visually.
A fair foundation deepening half a step reads as “a little warm.”
A deep foundation deepening half a step reads as orange, ashy, or muddy brown — depending entirely on which undertone the formula was built on.
Same magnitude of change. Wildly different visual consequence.
Sebum patterns amplify it.
Dermatologic research has repeatedly observed higher sebum excretion rates and larger sebaceous glands in Black skin specifically, though the literature isn’t uniform across all studies. What working artists see consistently is that the T-zone, nose, and chin on deeper complexions often produce enough oil to break down a base film in a matter of hours.
And oxidation doesn’t happen evenly. It happens where the oil is. So you don’t get a uniformly deeper face — you get an orange nose, a saturated forehead, and a jawline that stayed put. That patchwork is far more visible than a clean overall shift.
There’s no margin for error in the shade range.
When a brand offers 40 shades but only six of them live below a certain depth, most deep-skinned clients are already wearing a compromise. They started a half-step off. Then the base oxidized. Now they’re a full step off, in the wrong direction, with nothing in the lineup to correct back to.
Lighter complexions have room to absorb a shift. Deep complexions frequently don’t.
Camera and lighting will expose all of it.
Deeper skin reflects less light, which means the differential between an oxidized base and the untouched skin at the hairline, jawline, and ears becomes stark under flash, under continuous lighting, and on set. On a wedding day this shows up in every photograph after 3 PM. On a film set, it shows up as a continuity problem the colorist has to solve in post — on the very skin tones that already get mishandled in post.
Where Priming Does the Real Work
Priming isn’t about making foundation “glide.” That’s a byproduct. The actual job of a primer in an oxidation-prone situation is to stand between sebum and pigment for as long as possible.
There are three separate mechanisms, and most people only use one.
Barrier — keeping oil out of the film
Silicone film-formers (dimethicone, dimethicone crosspolymer, trimethylsiloxysilicate) create a hydrophobic layer that sebum has to work around rather than travel straight through. This doesn’t stop oil production. It buys you hours before the oil reaches your pigment.
Absorption — giving oil somewhere else to go
Silica, silica silylate, kaolin, perlite, nylon-12, PMMA, and starches (tapioca, aluminum starch octenylsuccinate) pull sebum into their own porous structure instead of letting it saturate your foundation. Look for these high in a mattifying primer’s ingredient list, not buried at the bottom.
Regulation — reducing how much oil arrives at all
This one is skincare, and it works on a timeline of weeks, not hours. Niacinamide at roughly 2–5% has been shown in studies to reduce sebum excretion rates with consistent use. Zinc PCA and retinoids do their own version of the same work. If your oxidation problem is chronic, this is the layer that actually changes the baseline — the primer is just managing the symptom.
The Prep Sequence That Actually Holds
Here is the order of operations, and the reasoning behind each step.
- Degrease before you hydrate. If you’re oily, a gentle alcohol-free toning step removes the residual sebum sitting on the surface. You’re not stripping the skin — you’re clearing the launchpad.
- Match skincare weight to skin behavior, not to habit. A rich occlusive moisturizer plus an emollient sunscreen underneath a foundation is a guaranteed slip. Oily and combination skin needs a lighter, faster-absorbing hydration layer — and it still needs one, because dehydrated skin overproduces oil in response.
- Wait. Genuinely wait. Five to ten minutes between skincare and primer, and another two to three between primer and foundation. Foundation applied over skincare that hasn’t fully absorbed is being diluted and destabilized from the moment it lands. This is the single most-skipped step and the cheapest fix on this list.
- Move Vitamin C to nighttime, or apply it well ahead. If it’s still working on your skin when your base goes on, its degradation byproducts are going to become part of your color story.
- Prime by zone, not by face. Mattifying primer belongs on the T-zone, nose, chin, and anywhere else you personally break down. Putting it everywhere on a combination complexion just creates dry, flat patches on skin that never needed it. The perimeter of the face often wants grip or hydration instead.
- Powder before the oil arrives, not after. Setting powder applied to skin that’s already broken through is chasing the problem. Set within the first few minutes, targeted to the same zones, with a light hand.
The 30-Minute Shade Test
Stop shade-matching at minute zero. Match at minute thirty.
- Apply the shade along the jawline into the neck — never the hand, never the inner arm. Those don’t match your face and never did.
- Wait a full 30 minutes. Live your life. Let it concentrate and let the sebum come up.
- Check it in daylight, then check it again in the lighting you’ll actually be in.
- Photograph it with flash at zero minutes and again at thirty. The camera catches the shift before your eye does — that’s exactly why it matters.
If it moved noticeably in 30 minutes, it will keep moving for eight hours.
For the Bride, and for the Set
If you’re getting married in a Georgia September, your base is being asked to survive humidity, an outdoor ceremony, hugging two hundred people, and a reception that ends after midnight. A base that oxidizes at hour four means your ceremony photos and your reception photos show two different skin tones.
That’s why prep and priming are non-negotiable on a wedding day for deeper complexions — and why the trial exists. A trial isn’t only about whether you like the look. It’s a live wear test on your actual skin, in your actual climate, for the number of hours you’ll actually need.
On set, the stakes are continuity. A base that shifts between the first setup and the last take creates a color problem that gets handed downstream to people who may not have the reference or the instinct to correct deep skin accurately. Locking the base at the start protects the work of everyone who touches the image after you.
Quick Answers
Does oxidation mean my foundation is bad?
Not necessarily. Every pigmented base concentrates as its carriers evaporate. The question is how far it moves, and whether your prep gave it a reason to move further.
Can I stop oxidation completely?
No. You can slow it substantially and keep it even. Anyone promising zero shift is selling something.
Should I just buy a shade lighter to account for it?
This is a trap on deep skin. You’ll wear a visibly ashy base for the first hour and hope it lands right later. Fix the prep, then match honestly at the 30-minute mark.
Why does it only turn orange in some spots?
Because sebum isn’t distributed evenly. Wherever your skin produces the most oil is where the pigment saturates first.
Does setting spray prevent it?
It helps lock the film and slows breakdown, but it doesn’t address sebum production or the concentration that happens as carriers evaporate. It’s a finishing step, not a substitute for priming.
Deep skin doesn’t need more product.
It needs better sequencing — and an artist who understands that a shade match is a moving target, not a fixed one.
Book Your Bridal TrialDecked Out Beauty · Gwinnett County & Metro Atlanta, GA · Bridal · TV & Film · Deep Complexion Artistry
One Brush, Three Ways: Why the Name on Your Blending Brush Doesn't Matter
By Derrica | Decked Out Beauty
If I emptied my professional kit onto a table right now, you'd see hundreds of brushes — and I promise you, at least half of them are doing a job that has nothing to do with the name printed on the handle. After a decade behind the chair in bridal and on TV and film sets, here's the biggest brush secret I can give you: the label tells you what the manufacturer intended. The shape, density, and fibers tell you what the brush can actually do.
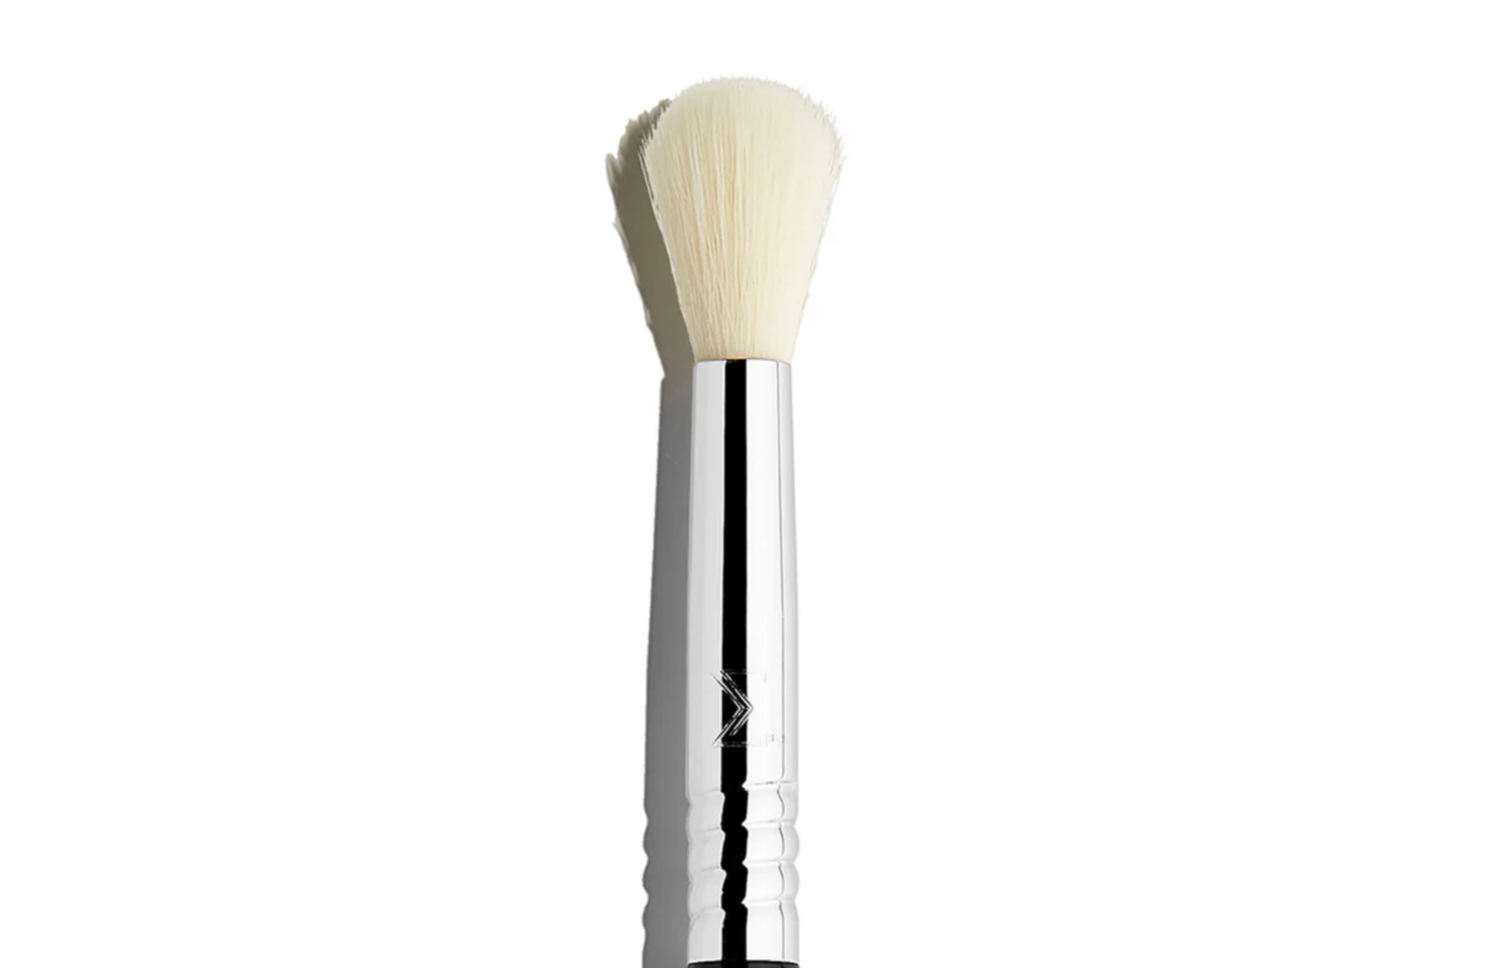
Today I'm proving it with the most underestimated tool in your collection — the fluffy eyeshadow blending brush — and then we're going deeper into brush fibers, because once you understand why a brush behaves the way it does, you'll never waste money on a 30-piece set again.
Way #1: Crease Work — But Smarter
Yes, this is what the brush was “made” for, but most people are still using it wrong. A blending brush isn't meant to apply heavy color — it's meant to move it.
Try this: apply your transition shade with a slightly denser brush (or even your finger), then go in with your blending brush completely clean using light, windshield-wiper motions right at the crease. The tapered, airy fibers diffuse the edge of the shadow without dragging pigment where you don't want it. That's how you get that seamless, airbrushed gradient — the shadow does the coloring, the blending brush does the finishing.
Way #2: The Most Natural Nose Contour You'll Ever Get
Here's where the label goes out the window. Most dedicated nose contour brushes are too dense and too flat — they deposit a stripe, and then you spend five minutes fighting to soften it.
A tapered blending brush is already the right size for the sides of the nose, and its airy fibers pick up just a whisper of powder contour. Sweep it from the inner brow down along the side of the nose in one continuous motion, then use the clean side of the brush to marry the edges. Because the brush deposits product so sheerly, you build the shadow gradually — which is exactly how contour should work, especially on deeper complexions where a heavy-handed cool-toned contour can go ashy fast. Sheer layers of the right undertone will always beat one heavy swipe of the wrong one.
Way #3: Precision Setting — Under Eyes, Smile Lines, and Detail Zones
Your big fluffy powder brush is beautiful for an all-over set, but it has no business under your eyes. It deposits too much product across too much surface area — hello, creasing and flashback.
A blending brush is the perfect size for pinpoint setting: press (don't sweep) a small amount of finely-milled setting powder under the eyes, around the nose, and into the smile lines. The tapered tip gets into the inner corner and right up against the lower lash line without disturbing your concealer. On my brides, this is exactly how I lock in a 14-hour wear without a single cakey spot in the photos.
The Real Education: Brush Fibers, Decoded
So why does one brush blend like a dream while another streaks and grabs? It comes down to fibers — and this is the knowledge that separates a collector from an artist.
Natural Fibers: Built for Powders
Natural hair brushes (traditionally goat, squirrel, or sable) have a cuticle — microscopic scales along each strand, just like the hair on your head. Those scales grip powder particles and release them gradually, which is why natural fibers give powders that soft, diffused, buildable finish.
- ◆Best for: powder eyeshadows, blush, bronzer, setting powder, powder contour.
- ◆The tradeoff: Natural fibers are porous, so they absorb liquids and creams (wasting product and breeding bacteria), they're harder to deep-clean, they're not vegan, and quality varies wildly.
Synthetic Fibers: Built for Creams and Liquids
Modern synthetic fibers (usually PBT — a type of polyester filament) are smooth and non-porous. They don't drink up your foundation, they release cream and liquid products evenly onto the skin, and they sanitize beautifully — which is why every brush that touches a cream product in my professional kit is synthetic. It's a hygiene standard, not just a preference.
- ◆Best for: foundation, concealer, cream blush and contour, liquid highlighter, anything wet.
- ◆Worth knowing: Synthetic technology has come so far that today's high-end synthetics mimic the cuticle texture of natural hair and handle powders impressively well. Many pro artists — myself included — now run kits that are heavily or entirely synthetic.
Duo-Fiber Brushes: The Hybrid
Those two-tone “stippling” brushes with dark dense bases and long white tips? The longer synthetic tips pick up minimal product for a sheer, airbrushed application, while the denser base gives you control. Gorgeous for cream blush and thin layers of foundation.
The Part Nobody Tells You: Density and Shape Matter Just as Much
Two brushes with identical fibers behave completely differently based on how tightly those fibers are packed. Dense = deposits. Airy = diffuses. Tapered shapes give precision; dome shapes give softness; flat shapes press product on. When you learn to read fiber + density + shape together, you can pick up any brush — regardless of what it's called — and know exactly what it will do.
That's the whole point: buy the brush for what it does, not what it's named.
The Takeaway
Your blending brush was never just an eyeshadow brush. It's a diffuser, a contour tool, and a precision setter — and it earned those jobs through its fibers, shape, and density, not its label. Master that way of thinking and your kit gets smaller, smarter, and far more capable.
Want to see these techniques in action on your own face — or need an artist who understands exactly which tools your skin tone deserves? Book a consultation and let's talk.
/Users/derricamarshall/Downloads/what-your-mua-wants-you-to-know-embed.html